Bloodborne: 10 Starting Tips for New Players
Matthew Wilson
Bloodborne is a 2015 Action-RPG from the incredibly talented developers at From Software, creators of the Dark Soul series, Elden Ring, and (perhaps less well known) the Armored Core series, among others. Due to being published by Sony Entertainment in a way that locked it to the PS4 console, Bloodborne is not as widely known as many of From Software's other titles. It is, however, just as well loved by it's fans, and it's even partly responsible for the commonly used phrase "Soulsborne", a descriptor used for other games in the genre in much the same way as the term "Souls-like". Despite being made by the same developer and being in largely the same genre, Bloodborne plays quite a bit differently than Dark Souls and Elden Ring. People trying Bloodborne for the first time after playing through other FromSoft titles may find the learning curve a bit difficult because of the differences. This guide will provide 10 tips for new-timers (and maybe even some established hunters) to help ease the transition and explain some of the basic ways that Bloodborne differs from other classics of the Genre.
1. Character Creation - Similar, but Different
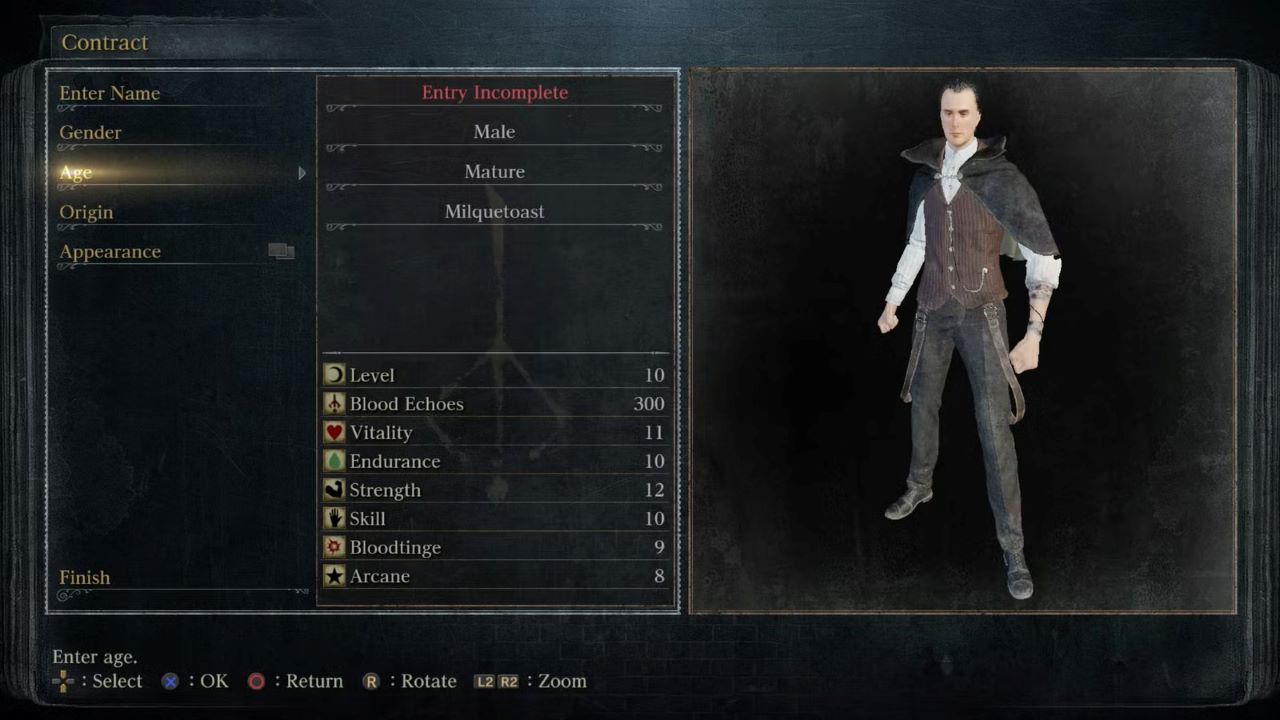
Character creation in Bloodborne follows the same basic formula the more familiar FromSoft Souls-like games follow. You can customize your character's name, appearance, and class just like you would expect. However, the differences are notable enough that they can trip up new players. Here's a quick rundown of the character creation step. There are fewer stats than most Souls-like games, including those by FromSoft. Fortunately, they're all pretty straightforward. At the top of the list you'll see your character's current starting level and a line titled "Blood Echoes". Blood echoes are Bloodborne's souls or runes and act much the same way as the currency for doing just about everything in the game. Below these two lines are the actual character stats that determine your build. 1. Vitality - Determines how much max health your character has. This works pretty much the same as any other games in the genre and does exactly what it says on the tin. Diminishing returns at 30, soft cap at 50. 2. Endurance - Determines your character's max stamina as well as damage-type resistances. Also pretty self-explanatory. Pretty severe soft cap at 40 for stamina, though resistances still scale a bit all the way to the hard cap
Bloodborne has no item weight or encumbrance system. This means you can carry as many items as you want, and there's also no fast/slow rolling mechanic (more on that later).
3. Strength - Determines weapon usability and damage for weapons that scale with strength. Diminishing returns at 25, soft cap at 50. 4. Skill - Determines weapon usability and damage for weapons that scale with Skill. Pretty much Bloodborne's version of Dexterity. Also affects damage from Visceral attacks (Bloodborne's version of repostes and backstabs). Diminishing returns at 25, soft cap at 50. 5. Bloodtinge - Determines weapon usability and damage for weapons that scale with Bloodtinge. This includes all firearms and some melee weapons. Diminishing returns at 25, soft cap at 50. 6. Arcane - Determines weapon usability and damage for weapons and items that scale with Arcane. This is basically Bloodborne's magic system, though it's not as involved as many magic systems in other FromSoft titles. This stat also increases Discovery (item drop) rates, up to a cap of level 50. Diminishing returns for weapons at 25, soft cap at 50. Like other Souls-like games, character customization includes picking a class, but in Bloodborne it's called your Origin. Unlike in Dark Souls and Elden Ring, your Origin in Bloodborne only affects your starting level and stats; it does not influence your starting equipment. Also of note is that you don't choose a starting item - everyone starts with the same stuff in Bloodborne!
2. The Hunt Begins - Your First 10 Minutes
Like other FromSoft titles, after you finish customizing your character, you start the game in an unknown location with a single path forward. Unlike other games in the genre, you start Bloodborne without any weapons or items. To top it off, as you make your way through the starting area, you quickly encounter your first enemy, a basic wolf-like beast feasting on a corpse. Without any equipment, how are you supposed to kill this thing? Well, like most Souls-like games, you're really not. Is it possible? Of course! Plenty of experienced players regularly kill that first enemy with their bare hands and continue on their merry way. But it's not necessary. In fact, like usual, dying to this first enemy is the standard way for the game to continue. If you do give the fight a shot and manage to kill the beast, you can make your way out of the starting area. The next opportunity you have to trigger the game's natural progression is when you find your first lantern at the top of a tall ladder. Either way, whether you die to the wolf or rest at the first lantern, you'll end up in what essentially acts as the central hub for the game (like Firelink Shrine in Dark Souls 3 or the Roundtable Hold in Elden Ring), called the Hunter's Dream. The Hunter's Dream deserves it's own section, which will come after this, but we'll go over the main reason you're here for the first time: getting your starting equipment. Going up the stairs by the doll, you'll see a few places where some strange creatures - called Messengers - are holding up a few items. This is where you get your initial weapons for the game. There are two choices to make, a firearm and a melee weapon. We'll briefly go over what those options are and what they mean for gameplay. Melee Weapons 1. Saw Cleaver - A good basic starting weapon. Scales with both strength and skill stats with decent speed and damage. Overall, this weapon has a high DPS and is often recommended for first-time players. Some hunter's have referred to the saw cleaver as the "easy mode" starting weapon since it typically makes the start of the game easier than the other two options. If you're looking for a balanced playstyle, or if you're wanting to smooth out the learning curve a little, the saw cleaver is a great choice. 2. Hunter Axe - Big and heavy, this is your standard starting strength weapon. The hunter axe hits hard, but it's slow. While this would usually be the go-to starting weapon for heavy-hitting strength builds, the basic mechanics of how Bloodborne plays differently compared to most Souls-like games makes this a difficult weapon to use for those unfamiliar with it. Not really recommended for first time players, even those going for a strength build. The saw cleaver is typically the better option unless you're looking for an extra challenge. 3. Threaded Cane - The de facto dexterity build starting weapon. It's fast, but compared to the other two choices it tends to hit like a wet paper bag. Starting with the threaded cane will pretty much require a new player to quickly figure out the dodging mechanics in Bloodborne, lest they end up getting pummeled while chipping away at a single enemy's health. Not a bad weapon by any means, especially for those looking for a more dexterity-focused play style, but lower DPS means more opportunity for the unforgiving combat to get the better of new players. Firearms The firearms offer some unique combat mechanics in Bloodborne, and the right build has a lot of potential for incredibly high firearm damage. However, for most players (and especially new ones), the biggest thing to keep in mind about firearms is that they aren't really there for dealing damage. Primarily, firearms serve as Bloodborne's parrying weapon, a mechanic that will be discussed more in depth later in the guide. For now, we'll just look at how they differ in a more immediate gameplay sense. 1. Hunter Pistol - A basic flintlock style pistol. Lower damage, but with higher range and greater accuracy. This firearm is fairly quick, which is useful for those wanting to get familiar with the mechanics of firing guns in Bloodborne without leaving themselves too open to attack. The lower damage of this gun means it's less likely to stagger certain enemies, particularly large ones, though it tends to work fine on humanoid and smaller enemies. 2. Hunter Blunderbuss - The first shotgun-style firearm available to the player. Lower range and accuracy is balanced by higher damage and a wider spread. The primary benefit to this firearm over the pistol is it's greater ability to stagger enemies, which provides a more forgiving result for missed parry timing. However, it's also much slower than the pistol to use, so any mistakes or missed staggers come with a near guarantee of being hit while stuck in the reload animation. This is a good pick for people who don't intend to learn the finer points of parrying at first and like the possibility of staggering even heavier enemies like the wolf beast at the start. That's essentially what you need to know about the starting weapon options. Just remember that whatever you end up picking, there's no wrong way to play. Starting can be made easier or harder by each weapon depending on your build, and while there's no way to respec your character in Bloodborne, there are plenty of other weapons to discover as you play.
3. The Hunter's Dream - A Home Away From Home
Before continuing with the gameplay discussion, we'll first take a quick detour to discuss the basics of the Hunter's Dream. You'll quickly become familiar with this location considering how often you'll end up here throughout your playthrough, but a quick introduction can help ease the transition. The Hunter's Dream is your main hub for doing everything from leveling up, upgrading weapons, buying and selling items, and traveling between locations in the game. You'll get here primarily by resting at lanterns - Bloodborne's version of bonfires or sites of grace - but there are also items that can transport you here from anywhere in the game, some at the cost of your blood echoes.
Unlike in Dark Souls and Elden Ring, there is no "resting" at the lanterns in Bloodborne. Healing your character, refilling your consumables like blood vials and silver bullets, and respawning enemies is all done by traveling to the Hunter's Dream.
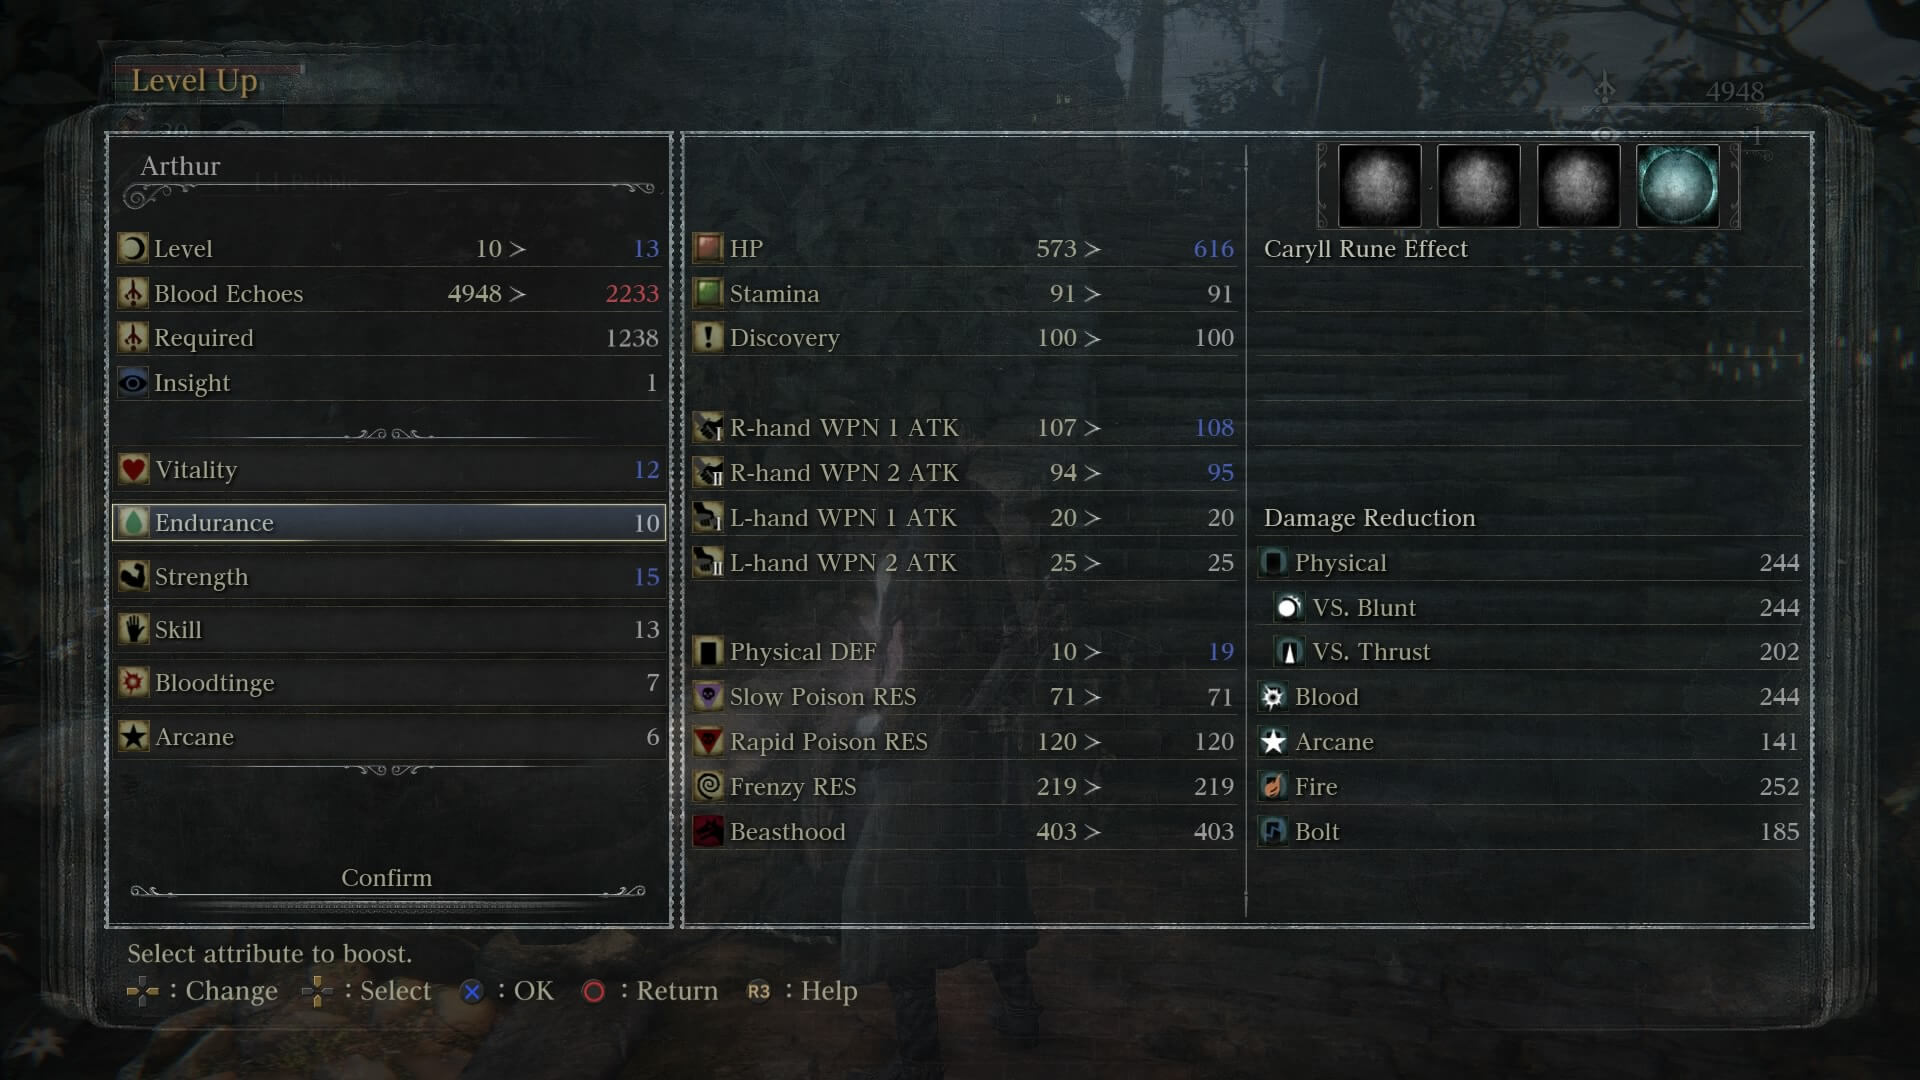
We'll briefly go over some of the more notable locations in the Hunter's Dream, which can feel a little maze-like at first to some. 1. The Doll - Upon first appearing in the Hunter's Dream, you'll be placed at the bottom of a curved staircase. Next to the bottom of this staircase is a life-size doll of a woman. Known only as The Doll, this NPC serves the same purpose as the Fire Keeper in Dark Souls 3 and Melina in Elden Ring, providing the player with a way to level their stats. You may notice on your first few times in the Hunter's Dream that The Doll seems to be lifeless. This is due to a mechanic in Bloodborne related to a secondary stat called Insight (see the Insight section for more information on this stat). Suffice to say that The Doll will remain lifeless until you have at least one Insight, which can be gained primarily by using items called Madman's Knowledge, or by discovering and defeating bosses. There are other ways, but those will be discussed further in the guide. Your first insight will likely come from using a Madman's Knowledge item later in your playthrough.
Because The Doll is lifeless so long as you have 0 Insight, you CANNOT level up your character until you gain your first one. Doing so should be a priority before progressing too far in the game, to the point where it may be wise for first time players to return to the Hunter's Dream using a Bold Hunter's Mark item immediately upon obtaining their first insight or Madman's Knowledge to avoid losing accumulated blood echoes before having a chance to use them.
2. The Headstones - Arrayed along the outer edge of the curved staircase are four headstones, which are increasingly decrepit and ghoulish from bottom to top. These headstones are the method by which players transport themselves to other areas of the game. Each headstone will contain a list of waypoints that reveal themselves as you discover and light more lanterns, with the only waypoint available at the beginning of the game being the 1st Floor Sick Room (where new players initially spawn) in the first headstone. The waypoints are grouped within the headstones in ways that may be confusing to first time players, so if you've recently discovered a new lantern (and lit it!) but don't see it right away, be sure to check the other headstones as it may be grouped elsewhere. 3. Bath Messengers - While looking at The Doll, you will notice a small depression in the ground to your left with another curved staircase on the other side. Nestled in the back of this depression is a bird bath, and when you approach it more of the strange Messenger creatures will rise up. These are the bath messengers, and they act as your primary merchant for the game. You can both buy and sell items and equipment here, with new options unlocking as you progress through the game. Important to note is that the bath messengers have the same availability as The Doll; if you have no Insight, you can't use the shop. Another important thing about the shop is that the price of many basic consumables will increase after certain bosses are defeated. Most of these can be obtained in other ways, typically as drops from defeated enemies, but do keep it in mind in case you happen to be in need of certain items at some point. 4. The House - At the top of the curved staircases in a house, within which you will find several useful things. There is a chest along the back wall (to the right if you enter from The Doll's staircase) which can be used to store anything you don't want to keep in your inventory. This is also where extra consumables go when you purchase or pick them up while carrying the max number (blood vials and silver bullets are the most notable; you can carry 20 at a time by default but can store an additional 600 in the chest). Consumables are automatically refilled to their max carry amount based on how many you have stored here, so there's no need to manually refill your stock. Further along the back wall is the Workshop, where you can upgrade your weapons and install blood gems to increase their capabilities and provide certain effects (blood gems are complicated, especially for new players, and as such are better discussed in a more in-depth guide). On the far end of the house is the Caryll Rune Workshop. Once unlocked, you can use this station to equip any Caryll Runes you've discovered, which act essentially as equippable buffs to provide extra bonuses to your character. Also in the house, you will find Gerhman. He's an NPC that provides no utility to the player and is only there for conversation (though you can attack him if you wish; if you do so, he vanishes until the next time you enter the Hunter's Dream). There are a few other aspects to the Hunter's Dream you may explore, but most are not as critical or of little interest to new players. These include the Insight Messengers just outside the house above The Doll, which provides another shop where you can buy (not sell!) specific items using your Insight; the chalice dungeon altars by the longer staircase, which provides access to completely optional side areas known as chalice dungeons; and the Hunter's Nightmare headstone, which lies at the top of the longer staircase and is only pertinent to those players who own The Old Hunters DLC.
4. Combat - Be Aggressive, Be-Be Aggressive!
The basics of combat in Bloodborne work pretty much the same as any other action game; you attack things, try not to get hit yourself, and whoever dies first loses. There are a few nuances to the combat system that are particular to Bloodborne, however, that bear a closer look. This is especially true for players who have experience with other FromSoft or Souls-like games. While Bloodborne shares some similarities to Dark Souls or Elden Ring, trying to play Bloodborne the same way you would those games will more often than not lead to more frustration than victory. This is mostly due to the unique combination of a few peculiarities in Bloodborne's combat system that differ from most games in the genre: trick weapons, dodging, and the rally system.
Rule #1 of fight club is that we don't talk about fight club. Rule #1 of Bloodborne combat is to be aggressive! There is a time and place for backing off or gaining some distance, but combat in Bloodborne is fast paced and intense. You will usually find greater benefit by aggressively pushing for more attacks than by waiting out the enemy and biding your time.
Trick Weapons First off is the idea of trick weapons. All right-handed weapons (typically melee weapons) are what's known as trick weapons, meaning they can transform from one shape to another at the push of a button. This means each right-handed weapon in the game has two forms, each with their own move set, attack styles, and sometimes even damage types. For instance, the saw cleaver in it's standard form (folded up) is classified as a Serrated weapon, and serrated weapons deal more damage to beast type enemies, while the transformed (unfolded) form does not deal serrated damage (damage and enemy types are complicated enough to warrant their own discussion, this is just a basic example). Most of the right-handed weapons in Bloodborne have two forms that match the pattern of form one being slightly faster with slightly lower damage and form two being slightly slower with slightly higher damage. There are nuances based on each individual weapon, but this is a good general overview. The important thing to remember about this is that a weapon can be switched at any point in time, even in the middle of a combo, and there are even transformation attacks that are specifically triggered when transforming mid-attack. Trick weapon transformations can be a fairly involved topic, with discussions revolving around the specifics of every combination of light attack, strong attack, and transformation attack for every weapon in the game. That discussion is well outside the scope of this guide; for now, simply keep in mind that every trick weapon in Bloodborne provides you with what are effectively two different weapons, with the difference between transformations being more or less extreme depending on the specific weapon. Dodging The next important piece of the Bloodborne combat puzzle is how dodging works. Most Souls-like games - especially the originals by FromSoft - involve rolling to dodge. This mechanic includes the concept of i-frames, which are fractions of a second during which your character is effectively "invincible" to taking damage. Bloodborne shares this basic concept, but there is no rolling. Instead, dodging in Bloodborne is more of a quick dash. This also means that, in combination with the lack of encumbrance, that every player in Bloodborne dodges the exact same way regardless of play style or equipment set. This dash-dodge can be done in any direction at almost any time, and the quickness with which it is executed lines up with the idea of aggression in Bloodborne's combat. Dodges are quick and efficient, meant to get you out of harm's way as quickly as possible so you can go right back to attacking the enemy. While the specifics of how dodging moves your character in Bloodborne can take a bit of getting used to, it's definitely one of the more straightforward combat mechanics, and shouldn't be too difficult to get used to.
For players used to playing defensively in other Souls-like games, you may be dismayed to find that there is no blocking mechanic in Bloodborne. While there are technically shields in the game (two, to be exact), they are not nearly as effective at blocking damage as shields in other FromSoft titles. What this means practically is that the only way you can avoid taking damage in Bloodborne is to not get hit in the first place. Learn to dodge, and do it well!
Rally The next combat mechanic we'll discuss is one that's unique to Bloodborne among FromSoft's Souls-like games. Referred to as the Rally system, this mechanic essentially boils down to the idea that a player is able to regain some health lost to an attack by attacking the enemy in return as quickly as possible after the damage is taken. When you get hurt in Bloodborne, your health bar will drop as expected. However, there will be a section of your health bar - usually a bit smaller than the amount of health lost - that is filled with a darker red than the standard health portion. This darker part of the health bar is your recoverable health, and if you attack an enemy while it's present, you will be able to see your actual health gradually fill up that space. The rally system is an essential part of Bloodborne's combat. You have a limited number of healing items - blood vials - just like most Souls-like games, and while Bloodborne allows you to loot more from enemies and other places while playing, relying solely on healing items can lead players to trouble. Allowing players to recover health by attacking enemies quickly after taking damage is the epitome of Bloodborne's number one rule of Be Aggressive. The more aggressive you are, the more likely you are to sustain a smaller portion of the damage you take as actual health loss. The rally system, like many mechanics in the game, comes with nuances that are better discussed in a more in-depth guide, but the basic idea is to get used to responding to damage not by gaining distance and healing but by moving in and attacking quickly. The more a player masters this mechanic, the more successful they are likely to be as they progress in the game.
5. Waking Up - After the Hunter's Dream
At this point, you should have visited the Hunter's Dream for the first time and acquired your starting equipment, either by dying to the wolf in the Sickroom area or by resting at the first lantern further on. Either way, you should now be ready to start exploring Yharnam properly. During your first excursion into the city with the proper tools, there are a few things to keep in mind to make it as easy as possible to familiarize yourself with the game. First of all, at this point you're likely unable to do much in the Dream, including leveling up, due to having no Insight. Finding your first Insight is a huge priority for this reason, and most players typically do this by picking up a Madman's Knowledge item later in the area. Unfortunately for new players, this doesn't happen for quite some time, which means that simply telling you where to find the item and expecting you to rush it is likely to be a death sentence. Instead, new players should focus on taking things slow. The first few areas you'll find yourself in contain a handful of pretty basic human enemies spread throughout. Some will be on their own, others will be in groups; the first real roadblock for new player progression is the large gathering of such enemies in the plaza area shortly after the lantern. As you make your way through the streets of Yharnam, take your time. Observe your surroundings, prepare for combat at any time (ambushes are definitely a possibility even this early on!), and focus on getting used to the basic controls and mechanics of the game. As you progress, you'll gain blood echoes for every enemy you kill, as expected. Because there's no way to spend these blood echoes until you unlock The Doll and the bath messengers after gaining your first Insight, there's a natural tension that builds as you gain more of them. Rest assured that, like most Souls-like games, dying is an expected part of play. If you do die, you are able to retrieve your lost echoes most often via a bloodstain near where you died - just like Dark Souls and Elden Ring - though occasionally your echoes will be "held" by an enemy in the area instead. You can tell when this happens because the enemy in question will have glowing eyes - killing them retrieves your echoes in much the same way as activating your bloodstain. Like most Souls-like games, the enemies respawn when you die or "rest" (by traveling to the Hunter's Dream). So while it may feel tense knowing you have no way of using the blood echoes you're collecting for now, you can always earn back any you lose permanently with a little more time spent in combat. Making your way through the city, you'll encounter several different types of basic and slightly more advanced enemies (and perhaps some NPCs if you explore enough). For brand new players, it is typically recommended to teleport directly to the Hunter's Dream once you've obtained your first Insight. In this case, you'll know you're close to that point when you encounter large rat enemies in a sewer-like area. An important thing to remember when you finally find that Madman's Knowledge: use it first! The Doll and the messengers don't unlock if you gain your first Insight while in the Hunter's Dream. If you gain Insight while there, you will have to move to any unlocked lantern and then transport yourself back to the Dream to utilize their services.
6. A Hunter Must Hunt - Your First Few Levels
Congratulations! You've successfully made it through the initial portion of the game, gaining the ability the level up and purchase useful items in the safe haven of the Hunter's Dream. Hopefully, unlocking these capabilities will help ease any discomfort you may have had playing the game for the first time. Now that you're here, we can talk a little bit about how to spend your blood echoes on your first few levels. With the exception of the Waste of Skin class, all Origins in Bloodborne start at level 10, which means the cost of leveling will be the same for everyone right out of the gate. There are some basic pieces of advice that are often repeated for new players around how to use your first few level-ups. For the most part, there really isn't a "best" way to level up at first. Where you put your first handful of levels depends on subjective points like your preferred playstyle, your starting class, your strengths and weaknesses in regards to the gameplay, and general personal preference. The choice is ultimately yours; this guide will instead discuss some of the common paths and their benefits and pitfalls, including why you might want to use them yourself. Health First Depending on your starting class, you may have started out with a relatively low Vitality stat. This in turn means that your starting health may seem somewhat anemic, causing you to die much more quickly than you might like. The starting Vitality for all the classes ranges from a low of 7 to a high of 14. If you're on the lower end of that range, you may wish to put your first few levels in Vitality to bump up your health and last a little longer in combat. If you choose to do so, a good place to be for most starting characters is somewhere between 12 and 15, depending on your starting Vitality stat. Stamina First If you're not concerned about your health, the next place you may have noticed a lack of capability depending on your class is your stamina. Since there's no blocking in Bloodborne, your primary defense is avoiding getting hit in the first place, usually by dodging enemy attacks. Doing so naturally takes stamina, as does attacking yourself. This means that low stamina in Bloodborne can be a heavy burden to carry, especially for those who are more inclined to dodge often. With a low of 8 and a high of 14, your Endurance stat has the same wide starting range as your Vitality. If you found yourself frequently low on stamina and unable to do much during your time in Yharnam so far, spending your first few levels on getting Stamina somewhere between 12 and 15 depending on your class could be a good bet. Damage First A frequent recommendation for many new players is to focus your first few levels on bumping up your damage output. Doing so can be a great strategy, primarily because at the beginning of the game, a few levels in the right stat can mean the difference between killing an enemy in four attacks and killing them in two. This means fewer opportunities for them to attack back, less stamina usage, and faster blood echo farming and general progress. If this sounds like a good idea for you, check which stat your chosen starting trick weapon scales with the most (either Strength or Skill) and get that stat up to at least 15 if you started lower than that, and possibly up to 20 if you're already at or close to 15. Other Stats The only stats not mentioned so far are Bloodtinge and Arcane. Generally, these stats are geared towards supporting specific builds, builds that aren't really applicable for a player just starting the game. Bloodtinge will directly affect how much damage your firearm does, as all firearms naturally scale with this stat. However, since firearms also do much less damage per hit than trick weapons, the impact it has on your gameplay at first is practically negligible. As for Arcane, it mostly affects the damage done by certain tools you'll acquire throughout the game. It does technically affect general damage of trick weapons, but not the standard damage types; higher Arcane increases the elemental damage done by a trick weapon when such damage types are present. With the exception of certain weapons you'll find later in the game, this is only really applicable when you use items such as Fire Paper or Bolt Paper to apply fire or bolt damage to a weapon temporarily. Generally speaking, while these stats do have their uses, it is perfectly acceptable to leave them be for quite some time unless you're going for a specific character build, which you likely aren't as a first time player.
7. Do It With Style - Further Discussions of Combat-Related Mechanics
We've already talked about the basics of how combat works in Bloodborne, particularly in how it differs from other Souls-like games. There are a few other mechanics that we haven't gone over yet, though, and now is a good time to do so now that you'll likely be making more progress and dealing with more combat situations. In this section, we'll be talking about healing, firearms and parrying, and the Visceral mechanic. Healing Recovering health in Bloodborne works like most video games. You have an item or items that give you back a portion of your health upon use. For those who have played other FromSoft titles, there are some definite differences to how healing works that you should keep in mind. The main method of health recovery using items in Bloodborne is via the Blood Vial consumable. These have been mentioned before, but how they work specifically was mostly glossed over. Blood vials recover a constant 40% of your maximum health. They are not upgradable or buffable (with the small exception of a particular rune, a topic discussed more in a later section); this percentage is accurate and applicable for the entire game. However, since it's a percentage, it does mean that you recover a larger absolute amount of health as your Vitality stat increases and bumps up your max health. Blood vials do not work like Estus Flasks in Dark Souls or the Flask of Crimson Tears in Elden Ring. At least, not exactly. It is true that you only have a certain number of uses (equal to the maximum number of vials you currently have on hand). However, in other FromSoft titles, the main way to recover these uses is by resting at a bonfire or site of grace (though Elden Ring has a few other ways, they're not the main method). This method can be used indefinitely to repeatedly max out the number of flasks you have, albeit at the cost of respawning all the enemies you've killed. Blood vials are not "infinite" in the way flasks are. They are consumable items like any other in Bloodborne. Your on-hand supply will refill when you visit the Hunter's Dream, but only if you have enough in storage to do so. If you're lacking in supply, you'll only refill up to however many you currently have in storage. On the other hand, blood vials are frequently dropped as loot from defeated enemies. This means that, given a player can progress without using too many vials, trips to the Hunter's Dream specifically to refill on blood vials can be unnecessary for large portions of the game. Of course, if you ever are in dire need of more and don't want to risk combat, blood vials are also purchasable at the bath messenger shop. What this all boils down to is that if you're ever in doubt about whether to heal with a blood vial, don't hesitate to do it! There's almost never a good reason to not keep your health topped off whenever you can as long as you have the vials to do so, and if you ever find yourself running low while playing, you can usually find enemies that will drop more fairly easily. Combined with the Rally system and a few other unique items and methods for recovering health, blood vials should always be treated as a resource to be used, not hoarded. Firearms and Parrying Firearms are somewhat unique in the realm of Souls-like ranged combat. While it is definitely possible to build your character in such a way that your firearms do decent damage in combat, that's not really their main role. Instead, they're primarily useful for staggering and parrying enemies, with parrying by far being the most common use of firearms by experienced players. But first, lets talk about ammo. In Bloodborne, you have two main consumables that are always visible to you. The first is blood vials, your primary method of recovering health. The second, visible in the UI just below blood vials, is Quicksilver Bullets. Quicksilver bullets mostly act as ammunition for your left-handed firearm-type weapons, which typically use a single bullet per shot. There are some exceptions for certain firearms found in the game, and certain types of non-consumable items also use quicksilver bullets, but you'll mostly be using them for firing your guns. Like blood vials, quicksilver bullets are often dropped by enemies, and while you can only carry a certain number on you at one time (20 by default, like blood vials), any extras are automatically stored in the Hunter's Dream, up to 600. They also refill automatically upon visiting the Dream, and can be purchased or sold through the bath messenger shop. Being the primary use case for firearms, parrying is an important topic to cover. That said, it's entirely possible to play through the game and beat it without ever intentionally parrying an enemy. However, it does come with some benefits that many players enjoy. The most obvious is that is staggers an enemy. Parrying them interrupts their attack and leaves them open to a quick counter. Timing is critical for this mechanic, as it is in most Souls-like games. To successfully parry an enemy's attack, you must fire your gun so that the shot strikes them within a short window just before their attack hits you. For some enemies, this window is actually rather large (for some, like the Church Servant often encountered in the Cathedral Ward area, the window is so laughably wide as to be almost impossible to miss). For others, finding the right window to parry is more difficult, and mastering the technique for all enemies in the game is a huge task even many experienced players struggle with. Mistiming your shot will almost always lead to you being hit due to the parry not triggering. If you intend to learn how to parry well, get used to taking damage, and remember your Rally and blood vials! The biggest potential benefit of parrying an enemy with your firearm involves that stagger window. When done correctly, it not only leaves the enemy open to a general counter attack, but it also provides an opportunity for what Bloodborne refers to as a Visceral. Visceral Attacks Visceral attacks are essentially Bloodborne's version of a backstab and riposte combined. Visceral attacks are possible to trigger just like backstabs in other Souls-likes; if you can sneak up on an enemy from behind and attack just right, you can deal a large amount of damage before the fight even starts, sometimes killing the enemy in one blow. Visceral attacks can also be done in response to a successful parry, and they're the main reason many players spend so much time practicing their parry timings. The most interesting thing about Visceral attacks is that they don't just deal damage based on your current weapon or your general damage output like many other Souls-likes. Visceral attacks and the damage they deal specifically scales with the Skill stat of your character. This does mean that players who are already doing a Skill-based build will naturally see more benefit from triggering Visceral attacks because they're already leveling Skill. However, even builds based on other stats can see decent damage from doing Visceral attacks on enemies, and there are other mechanics in Bloodborne that provide benefits as a result of a successful Visceral, such as increased blood echoes or health recovery. As mentioned before parrying - and as a result, Visceral attacks - are not a necessary part of the gameplay. Plenty of players go through the game, beginning to end, without intentionally doing either. However, if it fits your naturally play style, they can provide some major boons even in dire circumstances.
8. Stronger is Better - Weapon Upgrades and Blood Gems
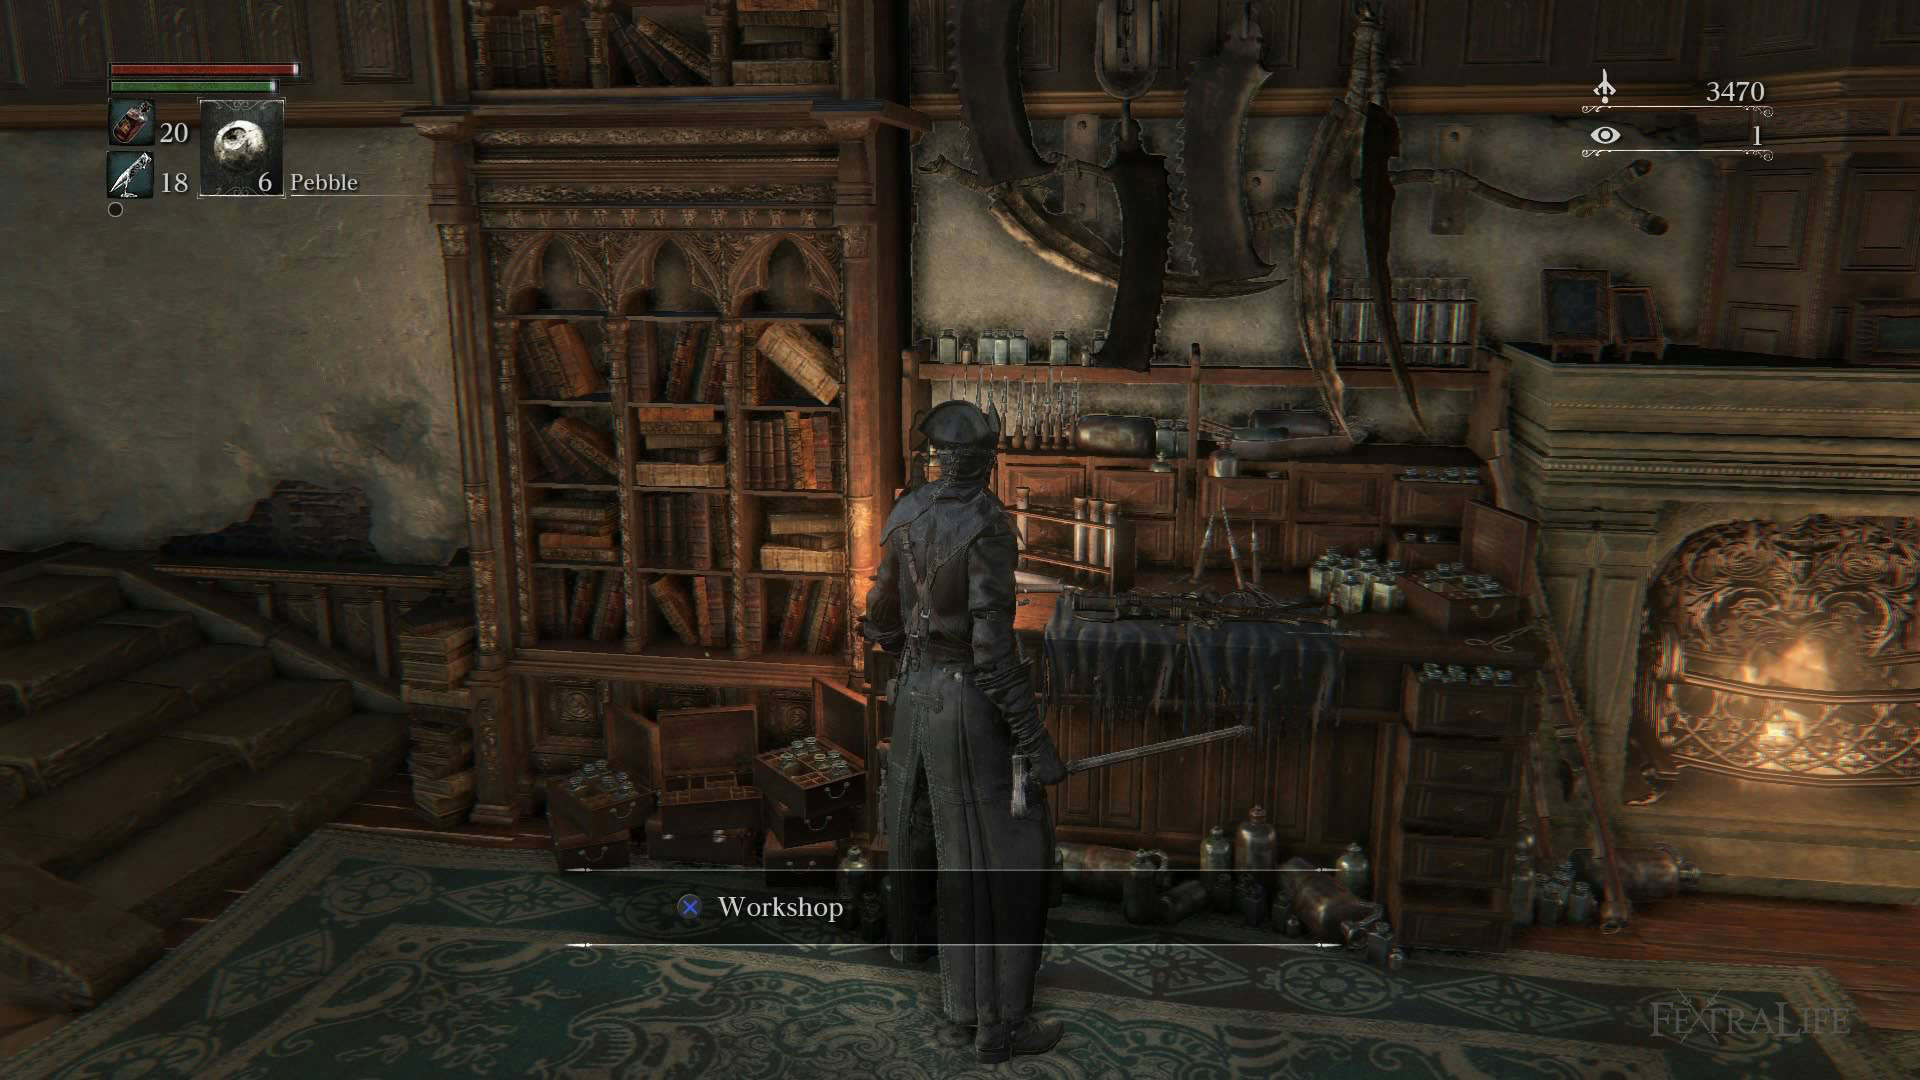
A big part of any Souls-like is upgrading - your stats, your gear, pretty much anything that has a level gets upgraded throughout the game if you don't want to fall behind and struggle later on. Bloodborne is the same, though because of the way combat works armor isn't nearly as big of a deal as it is in other games. The only gear you're really going to need to worry about upgrading is your weapons, but that just makes it an even more important part of your progression. Weapon Upgrades In Bloodborne, like many Souls-likes, your weapons are upgraded with a combination of the game's currency (in this case blood echoes) and some upgrade material. The upgrade material is Blood Stone Shards - at least at first. The name of the needed material changes as your weapons level up. Weapons in Bloodborne cap at +10. For levels +1 through +3, you need Blood Stone Shards; for levels +4 through +6, you need Twin Blood Stone Shards; levels +7 through +9 need Blood Stone Chunks; and +10 needs a Blood Rock. How you obtain the upgrade materials depends on which one you need. The first two are the easiest as they can be found as one-time loot pickups throughout the game, are farmable as drops from certain enemies, and they can be purchased pretty much indefinitely from the bath messengers after a certain point in the game. Blood stone chunks are found as pickups as well but can only be purchased later in the game from the Insight messenger shop (the bird bath above The Doll) for a rather high price (20 Insight). The Blood Rock is the hardest to obtain. In the main game, you can only obtain two, one as a somewhat hard to reach pickup in one of the late-game areas and another as a single-time purchase from the Insight shop for 60 Insight towards the very end of the main game. If you wish to play through the completely optional chalice dungeons, high level dungeons provide the opportunity to obtain more (3 as loot from chests, potentially more from bosses depending on drop rates). Finally, if you own The Old Hunters DLC, an additional blood rock can be found in a late-game area of the DLC. As with other Souls-likes, Bloodborne offers the ability to restart in a New Game+ after beating it. Doing so resets all pickups and purchasable items, including weapon upgrade materials. This means that if you're dedicated enough and play through enough times (or farm the chalice dungeons enough), you can eventually upgrade every weapon in the game to +10. However, most players usually only end up with two blood rocks, or three if they own the DLC. Once you've figured out your preferred play style and build, two or three blood rocks is usually more than enough to get all of your often-used weapons to max level. Blood Gems Bloodborne includes an interesting weapon attachment mechanic with attachments called Blood Gems. Blood Gems are typically dropped as loot from defeated enemies and bosses, though some (including one of your first) can be found as a result of NPC "story lines" or from doing things with other related items. Blood gems come in multiple types which are denoted by the shape of the blood gem with various possible effects, some of which can be detrimental as a way to balance out particularly good benefits. Blood gems as a whole topic are incredibly complex, and a deep discussion of them is well outside the purview of this guide. The basics are pretty easy to grasp, though. As you progress through the game, you'll naturally end up getting quite a few of these blood gems. Each weapon, both trick weapons and firearms, have a number of slots (typically 2-3) for blood gems to be inserted into at the same Workshop you upgrade weapons at. At first, only a single slot will actually be available for use. More slots will open up as you upgrade the weapon, with most weapons unlocking the second slot around +3 and the third slot (if present) around +5 or +6. As mentioned before, these blood gems can come with a wide range of effects, from increasing base damage of the weapon by a certain percentage, to decreasing stamina usage from attacks, even causing steady loss of health to balance out particularly large increases in damage or other positive affects. While blood gems have entire communities and discussions about how to min-max your weapons with them, for the average player that kind of play isn't necessary. Instead, it's usually more than enough to simply double check your available blood gems every once in a while when you're already in the Dream for other reasons. When you select a slot, all the blood gems you have that can be equipped in that slot are listed. As you move through the list, the final effect on the weapon's stats is shown. If the slot is empty, this usually means a green number in one or more stats indicating an increase. If a gem is already present, stats can show either green for an increase (meaning the selected gem provides a greater benefit than the one already equipped) or red for a decrease (meaning it provides less benefit than the currently equipped gem). When looking for gems to equip, keep in mind what you're wanting - an increase in damage, better elemental damage for fire or bolt paper usage, a decrease in stamina - and compare what each gem you have does to the weapon compared to its current state. If you see an improvement, swap it out. If not, or if there are other effects from the new gem you deem to be not worth the increase, leave the old one in. For first time players, keeping it simple is more than good enough to get a great deal of benefit from whatever gems you naturally come across. And if you later decide you want to see what all the hype is about regarding min-maxing gem usage, there are loads of resources available online for doing so.
9. Caryll Runes
Bloodborne offers yet another method of buffing your character with various effects: Caryll Runes. Caryll runes are "items" in the sense that you can pick them up as lootables throughout the game, but they aren't usable like most items. Instead, you equip them on your character in one of three dedicated slots through an interface accessed through the Memory Altar in the house in the Hunter's Dream. There are a handful of different runes in the game, and all of the standard Caryll runes have at least three (in the case of one rune, four) different levels that basically have an increased value of the same effect. The effects of the runes range from increasing health, lowering damage received, and increasing the number of blood vials or quicksilver bullets you can hold, as well as several others. Which runes you equip on your character is entirely up to you as a player. Pick the ones that you find the most useful or that match your playstyle the best. There's no real "best" set of Caryll runes, with the only possible exception to that being that if you have multiple levels of the same rune, it naturally makes sense to equip the most effective. Of course, you can also equip multiple of the same rune if you have them, increasing the benefit even more if you prefer! There is a second kind of Caryll rune called Oath runes. These runes are given to you by NPCs throughout the game and acts as sort of markers of membership in different covenants present in the game. Each oath rune also comes with certain benefits to your character stats or capabilities, though they are also used heavily in PvP play. If you don't intend to do any PvP in Bloodborne, you can simply choose the oath rune that provides the benefit you like the most, just like the others. There's a single dedicated slot for oath runes, so if you obtain any, it makes sense to equip at least one so long as they benefit you in some way. There is one very important thing to keep in mind regarding the Caryll runes. At the start of the game, the memory altar is inaccessible, preventing you from equipping any runes you might obtain. To use the altar and your runes, you need a certain item called the Rune Workshop Tool. Unlike other tools needed for unlocking basic mechanics like the Blood Gem Workshop Tool that are found organically while following the natural progression of the game, the Rune Workshop Tool is tucked away in an otherwise optional area of the game that is fairly easy to miss if you aren't prone to exploration in Souls-like games. To find this tool, you must defeat the Witch of Hemwick located in Hemwick Charnel Lane. For specifics of how to get to this area, there are loads of guides available with details. In summary, Hemwick Charnel Lane is reached by going around the left side of the Cathedral stairs in the Cathedral Ward area (as looking up the stairs from the bottom). The boss fight itself isn't too difficult, though guides for the area and the boss fight also exist in spades. The point is that if you want to benefit from the Caryll runes you find throughout your playthrough - and you absolutely do! - you'll need to obtain this tool.
10. Beasts All Over The Shop - Your First Boss Fight
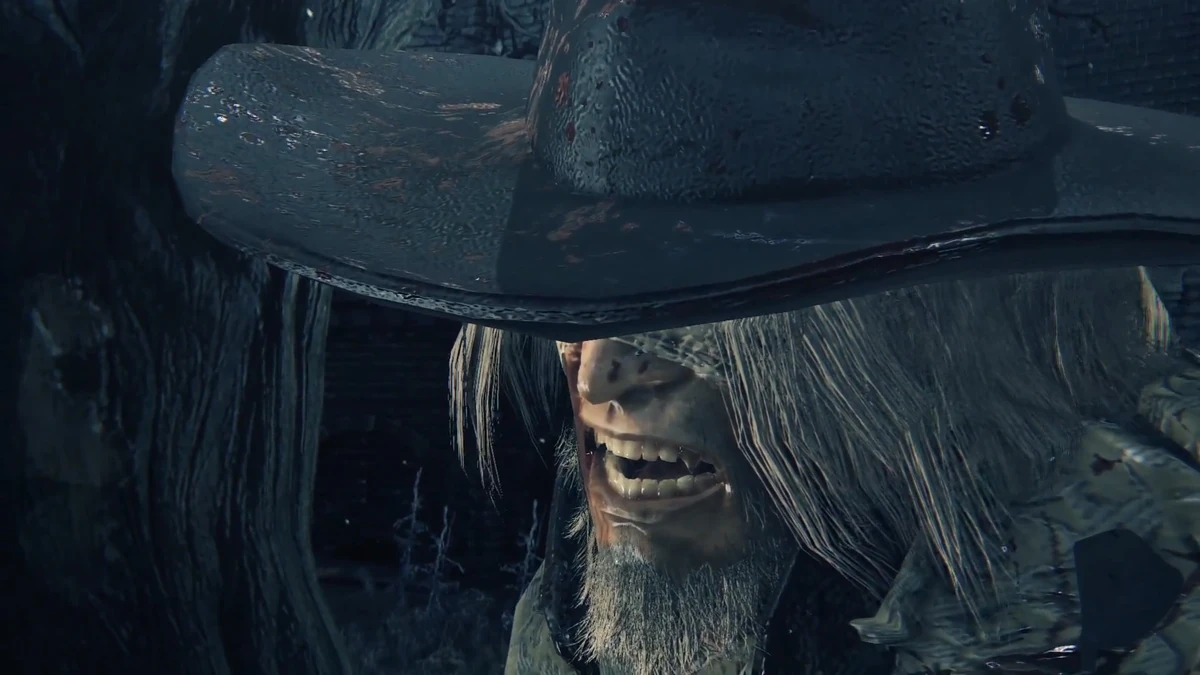
Now that we've discussed a lot of the basics you may need to know - including mechanics, useful items and tools, and even how to handle your first hour or two in the game - it's time to talk about the coup de grace: your first boss fight, Father Gascoigne.
Some experienced players may take issue with Father Gascoigne being referred to as the first boss since, technically, there is a different boss fight you can access before him (and likely will, if you're big on exploring). However, an argument can be made for this other fight with an enemy called the Cleric Beast being more of a mini-boss. There's no cutscene for the Cleric Beast fight and it's entirely optional, meaning it is technically possible to beat the game without killing the Cleric Beast or even knowing it's there. Therefore, mostly because Father Gascoigne is the first mandatory boss for progressing in the game, we'll consider him the first for the purposes of this guide.
Father Gascoigne is located in the Tomb of Oedon, a location that connects Central Yharnam with the Cathedral Ward. He is a hunter, much like you, but one who has slowly been subsumed by the beasthood growing in him as a result of the blood ministration. This leads him to perceiving you as a threat because, to him, you'll eventually turn into a beast too. Ironic, considering what happens to him during the fight. After the cutscene, Father G immediately runs toward you. Like the rest of Bloodborne, aggression is key in this fight, and Father G demonstrates that personally by being incredibly aggressive himself throughout the whole fight. He wields the massive Hunter Axe - an option you yourself could have chosen for your first weapon - and a modified pistol that acts more like a blunderbuss with a speed boost. He hits fast, he hits hard, and the best way to deal with him is to fight fire with fire. Father Gascoigne doesn't really give you much room to breathe, so his fight acts as a great skill check for how well you picked up the nuances of Bloodborne's combat mechanics, from dodging to rallying and maintaining aggression. Running away in this fight will get you killed. If you need to heal, this fight is a good place to learn that any opening for an attack is also an opening for using a blood vial. Keep on him, don't slow down if you can help it, and meet his aggression head on to have the best chance at beating him.
Father Gascoigne is a hunter just like you, which means anything you can do, he can do as well. This includes transforming his weapon, dodging your attacks, and - perhaps most dangerously - parrying your attacks. Gascoigne frequently uses his firearm. If you aren't attacking, it won't parry you, but it will still stagger you and leave you open to an attack if you don't react quickly enough. If you are in the middle of an attack and he manages to parry you, it's best to just hope he doesn't kill you then and there.
Part way through this fight, Father Gascoigne will undergo a transformation of his own. Driven mad by his blood lust, the Father will turn into a beast. His beast form is sort of a combination of the wolf beasts you've encountered before and a smaller version of the Cleric Beast. Upon transforming, he no longer uses the axe and pistol. Instead, he somehow becomes even more vicious and aggressive, attacking with his claws and fangs in a devastating show of force. As intimidating as that might sound, your strategy remains the same. Stay on your toes, remain in the fight, and match his aggression as well as you can. This is the first main boss fight of the game, so even though it acts as a hard skill check, if you've leveled well up to this point and come prepared for a tough fight, it is absolutely possible to beat him on your first try. It may not be likely, but it's definitely possible. If you do die, no worries! It's a Souls-like, that comes with the territory, and you deal with it the same way you would in any other game like it: you try again. Eventually, given enough perseverance, you will manage to beat him, opening up the rest of the game.
There is a somewhat secret strategy you can use on Gascoigne to make the fight somewhat easier, or at least to give yourself a bit of an edge. If you've been chatting with all the NPCs you find, including the ones at the windows with red lights, you may have come across a little girl asking after her father. If you have, the item she gives you may just come in handy during this fight, if you can find a chance to use it...
Grant Us Eyes - Further Reading and Exploration
And there you have it! Hopefully this guide helped you make it through your first time trying out Bloodborne. It may not be From Software's most well-known title, and it certainly isn't the most widely played considering it's locked to a single console that's (as of the time of writing) about 13 years old! That said, there's a huge community of players who consider Bloodborne to be FromSoft's best Souls-like game ever, with it's unique mechanics and fascinating world being a large part of that. There are plenty of things this guide didn't really touch on. Additional mechanics like beasthood and frenzy, differences between Beast enemies and Kin, the incredible depth and replayability of the chalice dungeons; Bloodborne has a lot to offer, and there are players who are still learning new things after years of playing and dozens of playthroughs. If you find yourself wanting to learn more about the intricacies of this amazing game, there are numerous resources available online. One of the best resources for everything Bloodborne according to many in the fanbase is the fan-made Bloodborne wiki at www.bloodborne-wiki.com. There are also numerous guides available online for general progression and side content, including much more in-depth discussions of mechanics that were only briefly touched on here.
Comments
Sign in to leave a comment.
Enjoying this guide? Sign up free to track your progress and earn XP.
Sign Up Free